Your new coop is so much more than just a box—it’s a safe haven for your flock and a beautiful addition to your backyard. The final step to bring that vision to life is the assembly. While we design our coops for a straightforward build, the right guidance makes all the difference. We want you to feel confident from the moment you open the first box. This guide provides detailed chicken coop assembly instructions and covers the crucial details, like proper ventilation and predator-proofing. These are the things that turn a good coop into a great one, ensuring your flock has a healthy, secure home for years to come.
Key Takeaways
- Prioritize function over aesthetics: A great coop is more than just a pretty structure. Focus on essential features like excellent ventilation, predator-proof hardware, and easy-to-clean surfaces to ensure your flock stays healthy and safe.
- A little prep makes assembly a breeze: Before you start, clear and level your build site, organize all your parts, and read the instructions completely. This simple prep work prevents headaches and makes the entire process much more enjoyable.
- The final details make all the difference: Once built, do a thorough safety check for sharp edges or gaps. Secure all openings with 1/4-inch hardware cloth to predator-proof the coop, and add personal touches that make daily chores easier.
What Is a Pre-Fab Chicken Coop Kit?
If you’re picturing a pile of lumber and a confusing blueprint, take a deep breath. A pre-fabricated (or "prefab") chicken coop kit is designed to make your life much easier. Think of it as a partially built coop that arrives at your door, ready for final assembly. Instead of cutting wood and measuring angles, you’ll work with pre-built panels for the walls, roof, and floor. These kits are designed to be easy to assemble, often requiring just a few basic tools to put everything together.
Most kits come with all the hardware you’ll need—screws, hinges, and latches—along with step-by-step instructions. This approach takes the guesswork out of building and is perfect for anyone who wants a high-quality coop without starting from scratch. Beyond the basic structure, these coops are designed with your flock’s comfort and safety in mind. They typically include essential features like built-in nesting boxes, roosting bars, and secure doors.
The best part is the variety. You can find kits in all shapes and sizes, from simple A-frames for a few hens to larger, walk-in models. Many companies even offer customizable coops that let you choose your own colors, roofing, and other features. This means you can get a coop that not only fits your space and flock size but also matches your personal style, all while ensuring it’s a durable, predator-safe, and comfortable home for your chickens.
DIY Assembly vs. Professional Build Costs
One of the biggest decisions after choosing your coop is whether to assemble it yourself or hire a professional, and the most significant factor is usually cost. Opting for a DIY assembly is the most budget-friendly path, as you’re saving on labor fees that can add a considerable amount to your total investment. With a high-quality prefab kit, you aren't starting from scratch. The panels are pre-built and all the necessary hardware is included, so assembly is straightforward and typically only takes a few hours. This makes the DIY route an accessible and rewarding option for most people, allowing you to put your savings toward fun coop accessories. While hiring a pro can be helpful for very large or custom projects, the satisfaction and savings of building it yourself are hard to beat.
How Do I Choose the Right Coop Kit?
Picking the right coop kit can feel like a huge decision, but it really comes down to a few key things: your flock's needs, your climate, and your personal style. A great coop is a long-term investment in the health and safety of your chickens, so it’s worth taking the time to understand what separates a basic box from a truly functional home. Let's walk through what makes a great coop so you can find the perfect fit for your backyard.
What to Look For in a Chicken Coop Kit
Before you get swept away by pretty designs, let's talk about the non-negotiables. The health and happiness of your chickens should always come first, and a coop's design plays a huge role in that. Excellent ventilation is at the top of the list. A coop with good airflow helps prevent moisture buildup, which is a major cause of respiratory issues and frostbite in the winter. Ample natural light is also important for keeping your hens productive and comfortable. Beyond that, look for features that make your life easier, like easy-to-clean surfaces and predator-proof hardware. A well-designed coop is safe, healthy, and simple to maintain.
Calculating Space Requirements for Your Flock
One of the most common mistakes new chicken keepers make is underestimating how much space their flock needs. Overcrowding is a recipe for stress, pecking, and the spread of disease. A happy chicken is one with room to stretch its wings, and providing adequate space is one of the most important things you can do for their well-being. A good rule of thumb is to provide at least 3-4 square feet of indoor coop space per standard-sized chicken and about 8-10 square feet per bird in the outdoor run. This gives them enough room to roost comfortably at night and forage during the day without getting in each other's way, which is essential for a healthy flock.
When deciding on your coop size, it’s also smart to plan for the future. Many chicken keepers start with a small flock, only to find themselves wanting to add more birds a year or two later—a phenomenon affectionately known as "chicken math." It’s far easier and more cost-effective to invest in a slightly larger coop now than to have to upgrade later. If you're raising hens for eggs, a good starting point is to plan for about two hens for each person in your family. This ensures a steady supply of fresh eggs. By thinking ahead, you can design a coop that will comfortably house your flock as it grows, ensuring a happy environment for years to come.
A Quick Guide to Popular Coop Brands
Once you know what features are essential, you can start looking at different brands. Each one has its own specialty, so it’s helpful to know what they’re known for before you start shopping.
Cutest Coops
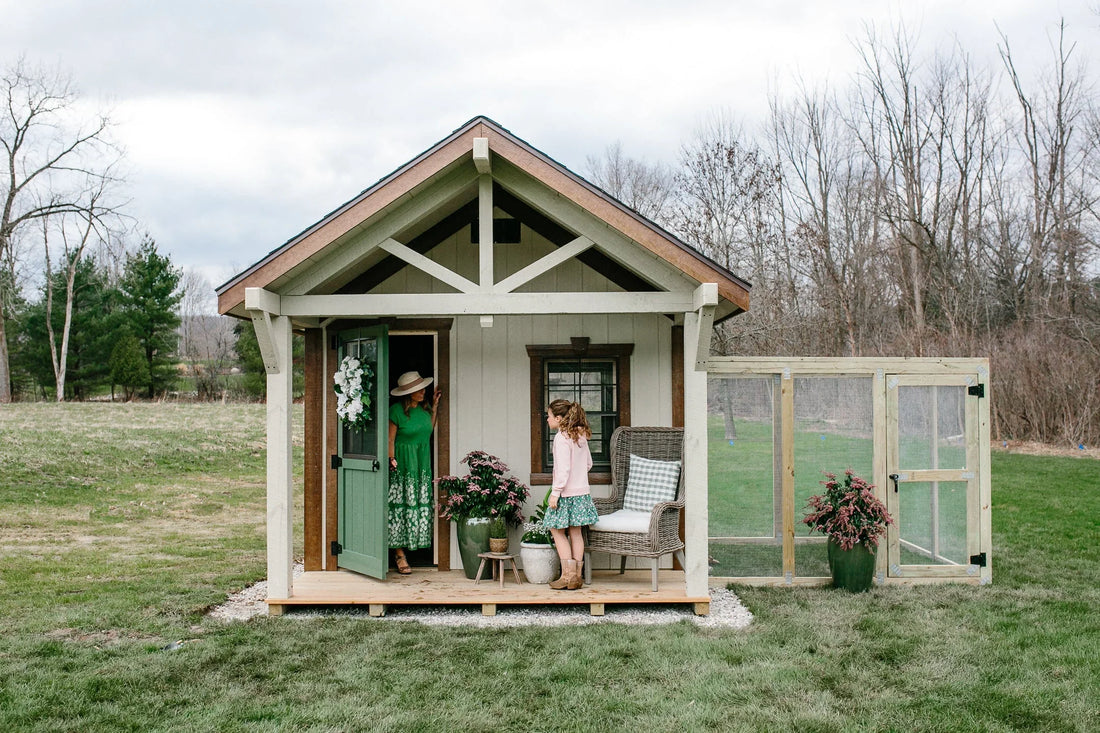
We specialize in creating beautiful, Amish-built coops that are as functional as they are stylish. Our designs are made to be the centerpiece of your backyard, not something you have to hide. We put a huge emphasis on safety, with predator-proof features built right in. But our real passion is helping you create the perfect home for your flock. Our customizable coops let you choose everything from the paint color to the interior layout, ensuring you get a coop that’s truly one-of-a-kind and built to last.
Rita Marie's Chicken Coops
Known for their high degree of personalization, Rita Marie's offers a wide range of add-ons. If you're looking for specific tech upgrades, this is a brand to check out. According to a review from The Feather Brain, customers can add features like automatic doors and full electrical packages. This flexibility allows you to build a coop with all the modern conveniences you might want for managing your flock.
The Chicken Coop Company
The Chicken Coop Company really focuses on the core principles of chicken health in their construction. They build their coop designs with an emphasis on providing excellent airflow and plenty of natural light. This commitment ensures that the coop environment is designed to keep your chickens healthy and productive from the get-go. If your top priority is a coop built around these fundamental wellness features, their models are worth a look.
OverEZ Chicken Coops
If you're looking for a straightforward assembly process, OverEZ is a popular name in the coop kit world. Their coops are generally recognized for being sturdy and having user-friendly designs that are relatively simple to put together. For many first-time chicken keepers, the promise of an "over easy" build is a major selling point. They offer a solid, no-fuss option for getting your flock housed quickly and securely.
Why a Little Customization Goes a Long Way
Customization is about so much more than just picking a paint color—it’s about creating a coop that perfectly suits your chickens and your lifestyle. Think about your daily routine and your climate. An automatic door can be a game-changer for busy mornings, while heated waterers can make winter chores much more manageable. You can also design the interior with the right number of nesting boxes and roosting bars for your flock size. When you design your own coop, you get to build a home that addresses all those little details, making chicken keeping easier and more enjoyable for everyone.
What Tools Will You Need for Assembly?
One of the best things about choosing a high-quality prefab coop is that you don’t need a workshop full of specialized equipment to put it together. Before you unbox your beautiful new coop, taking a few minutes to gather your supplies will make the entire process feel less like a project and more like a fun afternoon activity. Having everything you need within arm’s reach means you can get into a good workflow without any frustrating interruptions.
Whether you’ve chosen one of our beautiful in-stock coops or worked with us on a fully custom design, the assembly is designed to be straightforward. Getting organized first is the key to a smooth, successful build that will have your flock enjoying their new home in no time.
Your Essential Toolkit
You can relax—your required tool list is refreshingly short. The single most important tool for this job is a power screwdriver or a drill with a screwdriver bit. While you could technically use a manual screwdriver, a power tool will save you a significant amount of time and arm strength, making the assembly much more enjoyable. Most kits, including ours, are designed with pre-drilled holes, so all you need to do is drive the screws in. Make sure your power tool is fully charged before you begin, and you’ll be ready to go.
Extras That Make Assembly a Breeze
While not strictly required, a few extra items can make the assembly even easier. A good pair of wire cutters or snippers is incredibly helpful, especially when you’re installing hardware cloth or chicken wire to predator-proof your run. I also like to have a small level and a measuring tape handy to double-check that everything is perfectly square and aligned as I build. A rubber mallet can also be useful for gently tapping joints together without marring the wood. As you gather your tools, you can also start thinking about fun coop accessories to add once the build is complete!
Safety First: Don't Forget Your Gear
Building should be a positive experience, and that starts with staying safe. Please don’t skip this step! A sturdy pair of work gloves will protect your hands from splinters and scrapes. Safety glasses are a must to shield your eyes from sawdust and any small debris that might fly up, especially when you’re using a power screwdriver. If you’re sensitive to dust, a simple dust mask is a great idea. Finally, if you’re using a particularly loud drill or other power tools, some ear protection will keep your ears comfortable. These simple items ensure your focus stays on building a wonderful home for your chickens.
Prepping for a Smooth Chicken Coop Assembly
The moment your coop kit arrives is exciting! Before you tear open the boxes, taking a little time to prepare will make the entire assembly process feel less like a chore and more like the rewarding project it is. A bit of planning ensures your build day is smooth, successful, and maybe even fun. Think of it as setting the stage for a great performance. With your tools gathered and your space ready, you’ll be prepared to put together a beautiful, sturdy home for your flock without any frustrating setbacks. Let's walk through a few simple steps to get you ready.
Set Up Your Workspace for Success
First things first, decide on the perfect spot for your coop. Before the delivery truck even pulls up, you should have a location picked out. The most important factor is that the ground is flat and level. A stable foundation is critical for the coop's structural integrity and ensures that doors and windows will open and close properly. Clear the area of any rocks, roots, or debris. It’s also a great idea to lay out all the panels and hardware so you can see everything at a glance. This simple step will save you from hunting for a specific screw or panel mid-build. Considering your yard's layout is a key part of the process when you design your coop from the start.
Unboxing and Organizing Your Kit
The day your coop kit arrives feels a bit like Christmas morning for chicken keepers. While the urge to immediately start building is strong, taking a moment to unbox and organize everything is the secret to a smooth and enjoyable assembly. This isn’t a tedious chore; it’s the first step in bringing your coop to life. Lay out all the pre-built panels where you can see them, and take a quick inventory to ensure every piece is accounted for. This helps you visualize how the structure will come together and builds your confidence before you even pick up a drill. Our kits are designed to be complete, so you can trust that everything you need for your beautiful new coop is right there in the box.
Managing Deliveries and Sorting Hardware
When the delivery truck arrives, have a clear, accessible spot ready for the pallet, ideally close to your build site. Once the panels are laid out, turn your attention to the smaller pieces. Your kit includes all the necessary hardware, from screws and hinges to latches. Instead of leaving them in bags, I highly recommend sorting them into labeled containers—muffin tins or magnetic trays work wonders for this. This simple act of organization is a game-changer, saving you from the frustration of digging for the right-sized screw mid-build. It allows you to get into a rhythm and focus on the rewarding process of creating a safe, sturdy home for your flock. Getting organized now also frees up your mental space to dream about the fun final touches, like choosing the perfect coop accessories.
Read the Instructions (Yes, Really!)
I know it’s tempting to jump right in, but trust me on this one: read the entire instruction manual before you begin. Go through it from start to finish, even if you just skim the steps. This isn't about memorizing every detail; it's about getting a mental map of the whole process. You’ll understand how the pieces fit together, anticipate any steps that might require an extra hand, and confirm you have all the parts. It’s also the perfect time to see where you’ll install any fun coop accessories you’ve picked out. A quick read-through can turn a potentially confusing afternoon into a straightforward and satisfying project.
Pay Attention to Assembly Order
This is where reading the instructions really pays off. Coop kits are designed to be assembled in a specific sequence, and following that order is the secret to a frustration-free build. Think of it like building with blocks—you have to build the foundation before you can put up the walls. If you try to attach a panel before its support is in place, you’ll likely have to backtrack. The instructions provide the roadmap, showing you which piece connects to which and in what order, ensuring everything lines up correctly to create a sturdy, secure structure. This is especially important for more intricate custom projects where unique features have a specific place in the assembly line.
How Much Time Will This Take?
While our prefab kits are designed for a much quicker assembly than a scratch-built coop, it’s still wise to be generous with your time. Building a coop will likely take a few hours, so avoid trying to squeeze it in between other appointments. Block out an afternoon or a weekend morning so you can work at a comfortable pace without feeling rushed. Rushing is when mistakes happen. Put on some music, grab a cool drink, and enjoy the process of creating a safe and beautiful home for your chickens. If you're looking for a project you can start right away, our in-stock coops are ready to ship and assemble.
Your Step-by-Step Chicken Coop Assembly Guide
This is where the magic happens! With your space prepped and tools at the ready, you get to see your chicken coop come to life. Assembling a prefab kit is like a fun, life-sized puzzle where all the pieces are perfectly cut and ready for you. Just follow the manufacturer’s instructions, and you’ll have a beautiful, sturdy home for your flock in no time. The key is to work methodically and enjoy the process of building something wonderful with your own hands.
Step 1: Building the Frame
First, you’ll assemble the main structure. Lay out the wall panels on a flat surface, just as you organized them earlier. Following your guide, you’ll connect the pre-built wall, front, and back panels. This is often the quickest part of the assembly, and it’s so satisfying to see the coop’s shape form right before your eyes. Make sure all the connections are snug and secure before moving on. This foundational structure is what everything else attaches to, so taking a moment to ensure it’s solid and level will make the next steps much smoother.
Step 2: Installing the Floor and Roof
With the walls up, it’s time to make it a proper shelter. You’ll start by securing the floor panel into the base of the frame. Next, you’ll attach the roof panels. Depending on your coop’s design, this might involve lifting one or two large sections into place and fastening them to the top of the frame. This step truly transforms the structure into a cozy, protected space. Many of our customizable coops feature different roof styles, but the assembly principle is the same: create a sturdy, weather-resistant cover for your chickens.
Step 3: Adding Doors and Windows
Now you can add the features that give your coop its character. Carefully hang the pre-assembled doors and windows in their designated openings. Check that each one opens and closes smoothly without sticking. Most importantly, test all the latches to ensure they are strong and secure. A quality coop kit will have all openings, including ventilation slots, covered with 1/4-inch hardware cloth. This mesh is essential for keeping your flock safe from curious predators while still allowing for great airflow, a key feature in all our in-stock coops.
Step 4: Setting Up Nesting Boxes and Roosts
Finally, it’s time to furnish the interior. Install the nesting boxes, which usually involves sliding dividers into a pre-built box frame. A good rule of thumb is to have one nesting box for every three to four hens. Next, attach the roosting bars. These should be placed higher than the nesting boxes, as chickens naturally prefer to sleep in an elevated spot. This interior setup is what makes the coop a functional home. You can always add extra perches or other coop accessories later to make the space even more comfortable for your flock.
Proper Roosting Bar Placement and Design
Chickens have a natural instinct to sleep high off the ground, just like their ancestors did in trees. This is why getting the roosting bars right is one of the most important parts of setting up your coop's interior. The bars should be placed higher than anything else in the coop, especially the nesting boxes. For comfort and foot health, the roosts should be about two inches wide with slightly rounded edges, not a skinny, round dowel. This shape allows them to sleep flat-footed and stay warm by covering their feet with their bodies in winter. Make sure there’s enough bar space for every chicken to perch comfortably without being overcrowded or pooping on a friend below.
Positioning Nesting Boxes Correctly
Nesting boxes should be a quiet, dark, and safe-feeling space for your hens to lay their eggs. The golden rule of nesting box placement is to keep them lower than the roosting bars. If the nesting boxes are the highest point in the coop, your chickens will try to sleep in them, which leads to messy boxes and dirty eggs. By placing them lower, you encourage them to be used only for laying. A good guideline is to provide one nesting box for every four to five hens in your flock. This ensures no one has to wait in line and makes egg collection a clean and simple chore for you. Getting these details right is what makes our customizable coops so comfortable for your flock.
Keeping Your Hens Comfy: Ventilation and Insulation
With the main structure of your coop assembled, it’s time to focus on the details that turn it from a simple box into a healthy, comfortable home for your flock. Getting the ventilation and insulation right is arguably one of the most important steps for ensuring your chickens thrive year-round. Think of it as creating the perfect indoor climate. Your chickens need constant fresh air to stay healthy, but they also need protection from harsh weather like driving rain, biting wind, and extreme temperatures. It’s a delicate balance, but a well-designed coop makes it easy to achieve.
Chickens naturally produce a surprising amount of moisture and ammonia, which, if trapped inside the coop, can lead to serious respiratory illnesses and even frostbite in the winter. Proper ventilation whisks this damp, unhealthy air out while drawing fresh air in. At the same time, a well-built, weatherproof structure acts as insulation, shielding your birds from the elements without being completely airtight. High-quality customizable coops are specifically designed with this balance in mind, incorporating features like ridge vents and windows that provide excellent airflow. Understanding these principles will help you choose the best location for your coop and manage it effectively through every season.
Why Good Airflow and Light Are So Important
Proper airflow is non-negotiable for a healthy flock. Chickens release moisture with every breath, and their droppings produce ammonia. Without a way for this humid, ammonia-laden air to escape, it creates a toxic environment that can cause respiratory infections. The key is to have vents located high up in the coop, well above where your chickens roost. This allows warm, moist air to rise and exit without creating a cold draft directly on your birds while they sleep. Natural light is just as important. Ample sunlight helps regulate your hens’ laying cycles and keeps the coop interior drier and more sanitary. A bright, airy coop makes for happy, healthy, and productive chickens.
Using Supplemental Lighting for Egg Production
As the days get shorter in the fall and winter, you might notice a dip in your egg basket. This is completely normal! A hen’s laying cycle is directly tied to the hours of daylight she receives. To keep your hens laying consistently through the darker months, you can add a little supplemental light inside the coop. The key is to be gentle. A low-wattage, soft yellow bulb on a timer is all you need to extend the "day" by a few hours in the morning or evening. You don't want to leave the light on 24/7, as your flock needs their beauty sleep to stay healthy. The goal is simply to mimic the longer days of spring and summer, not to create a brightly lit factory. A well-designed coop with plenty of windows for natural light is the best foundation, making supplemental light just a helpful tool for the season. When you design your coop, considering window placement is a great first step for happy, productive hens.
How to Weatherproof Your Coop
Weatherproofing is all about protecting your flock from the elements while maintaining that crucial airflow. Start by considering your coop’s location. If possible, position it to get plenty of morning sun, which helps warm and dry the coop naturally. Many premium in-stock coops are designed with elevated foundations, which is a fantastic feature. Lifting the coop off the ground prevents moisture from seeping in from below, which keeps the floor dry and extends the life of the wood. It also adds a layer of protection from critters. Finally, ensure the coop is structurally sound with no unwanted gaps in the walls or roof that could let in drafts or rain, while making sure your dedicated ventilation points remain clear.
The Importance of Staining Your Coop
Once your coop is built, there’s one final step that makes all the difference: staining. This isn’t just about making your coop look pretty—it’s one of the most important things you can do to protect your investment and your flock. A quality stain acts as a shield, sealing the wood against moisture and harsh UV rays that can lead to rot and decay over time. This protective layer is crucial for maintaining the structural integrity of your coop, ensuring it remains a safe, sturdy home for years. It also makes cleaning so much easier. A sealed surface prevents mites and other pests from burrowing into the wood grain and makes wiping down surfaces a breeze. When choosing a product, always opt for a non-toxic, chicken-safe stain to keep your flock healthy. It’s the perfect finishing touch that preserves the beauty of your coop and simplifies your chores.
Setting Up the Coop Interior for Happy Hens
Now that your coop is built, it’s time to turn it into a home. The interior setup is all about creating a clean, comfortable, and engaging environment for your flock. A well-prepared coop not only keeps your chickens healthy but also makes your daily chores significantly easier. From the bedding on the floor to the placement of roosting bars, every detail contributes to your flock’s well-being. A thoughtfully designed coop provides a fantastic foundation, but these final touches are what truly make it a sanctuary. Let’s get the inside ready for its new residents.
Choosing the Best Bedding for Your Coop Floor
The first step in outfitting your coop interior is choosing the right bedding. The bedding’s main job is to absorb moisture and droppings, which helps keep the coop dry and control ammonia levels. Dry, absorbent materials like pine shavings or straw are excellent choices. Start by spreading a clean, even layer about one to two inches deep across the entire floor. You’ll want to spot-clean any particularly soiled areas daily and plan on completely replacing the bedding at least once a month. A clean floor is the foundation of a healthy coop environment, preventing the buildup of harmful bacteria and keeping your chickens’ feet healthy and clean.
What to Know About the Deep Litter Method
For a more hands-off approach, you might consider the deep litter method. This technique involves starting with a layer of bedding and continuously adding fresh layers on top, allowing the material to compost in place. Over time, beneficial microbes in the bedding break down the waste, which helps control odors and even generates a small amount of heat to warm the coop in winter. This method requires careful management—you’ll need to turn the litter regularly with a pitchfork to keep it aerated and dry. When done correctly, it can be a sustainable way to manage waste, but it’s crucial to ensure it never becomes damp or overly compacted.
Making Cleanup Easier
Let’s be honest: cleaning the coop is probably not the part of chicken keeping you’re most excited about. The good news is that a smart setup can make this chore quick and painless. Chickens do most of their pooping at night while they sleep on their roosts, which means the area directly below the roosting bars gets messy fast. By focusing your cleaning efforts here, you can keep the entire coop much tidier with minimal effort. Our custom projects often include features specifically designed to simplify cleaning, because we know that an easy-to-maintain coop makes for a happy chicken keeper.
Using Droppings Boards and Sealing the Floor
One of the best tools for easy cleanup is a droppings board. This is simply a tray or board placed directly underneath the roosting bars to catch nighttime waste. Each morning, you can slide the board out, scrape the droppings into a compost bin, and slide it back in. This simple five-minute task removes the majority of the coop’s waste and dramatically reduces ammonia levels. To make cleaning even easier, consider sealing the coop floor with a coat of paint or linoleum. This creates a non-porous surface that’s simple to wipe down and prevents waste from soaking into the wood.
Stocking Your Coop: Essential Supplies for Healthy Chickens
With the interior beautifully set up, it's time to stock the pantry. Providing your flock with the right supplies is essential for their health, happiness, and productivity. This means more than just food and water; it includes everything they need to digest their food properly, form strong eggshells, and stay free from pests. Getting these essentials in place before your chickens arrive will ensure a smooth transition and set them up for a healthy life. Think of it as preparing a well-stocked home where your flock has everything they need to thrive from day one.
Understanding Chicken Feed, Grit, and Calcium
The foundation of your flock’s health is their diet. You’ll need a dedicated feeder and waterer to provide constant access to fresh food and clean water. Simple, durable designs often work best, as they are easy to clean and refill. You can find a variety of feeders and waterers in our coop accessories collection. Beyond the basic feed, chickens have a few other unique dietary needs that are crucial for their digestion and egg production. Understanding these needs will help you raise a robust and productive flock.
Feed Types by Age
A chicken’s nutritional needs change as they grow, so you’ll need to provide age-appropriate feed. Baby chicks start with a high-protein "starter" feed. As they mature into their awkward teenage phase, they transition to a "grower" feed. Once your hens are ready to start laying eggs, typically around 14 to 18 weeks of age, you’ll switch them to a "layer" feed. This formula has less protein but contains the extra calcium they need to produce strong, healthy eggshells. Providing the right feed at the right time is one of the easiest ways to support their development.
The Role of Grit and Calcium
Since chickens don’t have teeth, they need a little help digesting their food. They consume small stones, or "grit," which sits in their gizzard and grinds up their food. You should provide a small dish of commercial grit so they can take what they need. Layer feed contains calcium, but it’s also a good idea to offer a free-choice calcium supplement, like crushed oyster shells. This ensures your laying hens have everything they need to form hard, perfect eggshells. You can simply offer both grit and calcium in separate, small containers for them to access as needed.
Health Supplements and Natural Pest Control
A clean coop is the first line of defense against pests, but a few natural supplements can help keep your flock extra safe and healthy. Many chicken keepers swear by food-grade diatomaceous earth (DE) as a natural way to control mites and lice. DE is made from fossilized aquatic organisms and works by drying out the exoskeletons of insects. To use it, just sprinkle a light dusting in the nesting boxes, in the corners of the coop, and in their favorite dust bathing spots. It’s a simple, non-toxic way to keep pests at bay and ensure your chickens stay comfortable.
Preparing for Baby Chicks: The Brooder
If you’re starting your flock with adorable, fluffy baby chicks, they won’t be ready for the main coop right away. For the first six to eight weeks of their lives, they need to live in a warm, safe, and draft-free environment called a brooder. A brooder can be as simple as a large cardboard box or a stock tank. You’ll need to equip it with a heat lamp to keep the temperature just right, along with chick-sized food and water containers and a layer of bedding. This temporary home keeps them protected until they are fully feathered and strong enough to move into the coop.
Planning for Egg Production and Storage
One of the greatest rewards of keeping chickens is collecting fresh eggs every day. Your hens will likely start laying when they are between 14 and 18 weeks old, though their production will naturally slow down during the shorter days of winter. Make it a habit to collect eggs daily to keep them clean and prevent them from being accidentally broken. You can store them in a cute egg basket or carton on your counter. Fresh, unwashed eggs have a natural protective coating called a bloom that keeps them fresh for several weeks without refrigeration, adding a charming touch to your kitchen.
Finishing Touches: Safety and Style
With the main structure assembled, you're on the home stretch. Now it's time for the final, and arguably most important, steps: securing the coop against predators and adding the personal touches that make it a true home for your flock. These details are what separate a good coop from a great one, ensuring your chickens are safe and their home is a beautiful part of your backyard.
Predator-Proof Your Coop
Your chickens' safety is the top priority. While our customizable coops are built with security in mind, a few extra steps can give you complete peace of mind. Carefully check all openings, including windows and vents. Cover them with 1/4-inch hardware cloth to block even the most determined raccoons and weasels. For an added layer of defense against digging predators like foxes or dogs, you can bury a "skirt" of this same hardware cloth around the entire perimeter of the coop and run. It’s a bit of extra work, but knowing your flock is tucked in safe and sound every night is well worth the effort.
Make It Your Own with Personal Touches
Now for the fun part! This is your chance to add personality and practical flair to your coop. Think about making daily chores easier by adding hooks inside for feeders and waterers or on the exterior for your cleaning tools. A little organization goes a long way. You can also give your coop a custom look with a fresh coat of paint or stain in a color that complements your home or garden. Don't forget to browse for fun coop accessories like custom signs, flower boxes, or even a decorative rain barrel. These small additions make the coop truly feel like a part of your home.
Coop Care: Maintenance and Troubleshooting
Even the best-laid plans can hit a snag, but don’t worry—most assembly issues are easy to solve. Once your coop is built, a simple maintenance routine will keep it in top shape for years, ensuring your flock stays happy and healthy. A well-maintained coop isn't just about looks; it's about providing a safe, clean, and comfortable home for your chickens.
Think of your coop as a long-term investment in your flock's well-being. A little bit of care goes a long way in preventing bigger problems down the road, from pesky drafts to predator vulnerabilities. By staying on top of cleaning and seasonal checks, you create a stable environment where your chickens can thrive. Let’s walk through how to handle common issues and set up a simple care schedule.
What to Do If You Get Stuck During Assembly
Hitting a wall during assembly can be frustrating, but take a deep breath. Most prefab kits are designed to be user-friendly. The panels often arrive pre-assembled, meaning the tricky cuts and gluing are already done for you. Most of the time, all you’ll need is a screwdriver—though a power screwdriver will definitely make the job go faster. If a piece isn’t fitting quite right, double-check the instructions to make sure you haven’t swapped two similar-looking panels. It’s an easy mistake to make! If you’re still stuck, take a break and come back with fresh eyes. And remember, this hands-on experience is great practice for when you’re ready to design your own coop from the ground up.
A Quick Guide to Cleaning and Seasonal Care
A clean coop is essential for a healthy flock. Your routine should include space for nesting boxes, roosting bars for sleeping, a feeder, and a waterer. Great ventilation is also non-negotiable for circulating fresh air. Many modern coops include features like slide-out trays to make removing droppings much simpler. Beyond daily tidying, plan for a deeper clean seasonally. You should also routinely check the coop for any damage, like loose boards or gaps in the wire, to keep it secure. Having the right coop accessories from the start can make this entire process much more efficient, giving you more time to simply enjoy your chickens.
Your Monthly Deep-Cleaning Routine
Once a month, it’s a good idea to go beyond the daily spot-cleaning and give your coop a thorough reset. Start by removing all the old bedding from the floor and nesting boxes. This is your chance to really scrub down all the surfaces—the roosting bars, walls, and floor—with a coop-safe cleaner like a simple vinegar and water solution. While the coop is empty and airing out, do a quick inspection. Check for any loose boards, wobbly roosts, or gaps in the hardware cloth that might need attention. This routine check is crucial for keeping the coop secure and predator-proof. Once everything is completely dry, lay down a fresh, deep layer of bedding. This monthly refresh keeps ammonia levels down, prevents pests, and ensures your flock has a healthy, comfortable space. Investing in a coop designed for easy cleaning, perhaps one from our collection of customizable coops, makes this essential task feel much more manageable.
Final Checks for a Safe and Sturdy Coop
You’re in the home stretch! With the main structure assembled, it’s tempting to introduce your flock to their new home right away. But taking a few moments for these final checks will make all the difference. This is where you turn a good coop into a great one—a truly safe, comfortable, and durable haven for your chickens. Think of these last steps as the finishing touches that ensure your hard work pays off for years to come. A little extra attention now gives you complete peace of mind and sets your flock up for a happy, healthy life in their new space.
Why You Should Phone a Friend
While you’ve likely managed most of the assembly solo, some tasks are simply easier and safer with a partner. If you’ve ever tried to stretch and attach hardware cloth by yourself, you know it can feel like you need an extra set of hands. Having a friend hold panels steady, support a door while you attach hinges, or help lift the finished coop into its final position can prevent frustration and potential mistakes. Plus, after hours of focusing on instructions, a fresh pair of eyes is invaluable for spotting something you might have missed, like an uneven panel or a screw that isn't quite flush. Make it a fun final step and promise them some fresh eggs as a thank you!
Give It a Final Safety and Airflow Check
Before calling it done, do a final walkthrough with your flock’s health and safety as your top priority. Proper ventilation is critical for preventing respiratory issues caused by ammonia buildup and moisture, so ensure your vents are unobstructed. Next, get serious about predator-proofing. Raccoons, weasels, and even neighborhood dogs can be persistent. Check every opening, including windows and vents, and cover them securely with 1/4-inch hardware cloth. This is a non-negotiable step for keeping threats out. Your chickens are counting on you to create a secure space, and you can find the right coop accessories to make their home as safe as possible.
The Final "Wiggle" Test
Now for one last inspection to ensure everything is perfect. Run your hands along all interior and exterior surfaces to check for sharp screw tips, splintered wood, or rough edges. Wiggle the roosting bars to confirm they’re secure enough to hold your entire flock. Open and close all the doors and latches to make sure they operate smoothly. It’s also a great time to confirm your coop is on perfectly level ground, as an uneven base can cause the frame to warp and doors to stick over time. If you're still in the planning phase, you can use our tool to design your coop and visualize how it will fit in your yard.
Related Articles
- Classic Chicken Coops | Cutest Coops
- Farmhouse Chicken Coop with Porch | Cutest Coops
- Barn-Style Chicken Coop | Cutest Coops
- Customizable Chicken Coop | Cutest Coops
- Cute Chicken Coop | Cutest Coops
Frequently Asked Questions
How long does it actually take to assemble a coop kit? While every coop is a little different, you should plan to set aside a full afternoon or a weekend morning for assembly. The goal isn't to break a speed record. Rushing is when you might misread a step or overtighten a screw. It’s much better to block out a generous amount of time so you can work at a steady, comfortable pace. Having a friend help can definitely speed things up, especially when it comes to lifting roof panels or holding doors in place.
Do I need prior building experience to put a prefab coop together? Absolutely not. If you’ve ever successfully assembled a piece of flat-pack furniture, you have all the skills you need. Our high-quality kits are designed for this exact reason. The panels are pre-built, the holes are pre-drilled, and the instructions walk you through the process step-by-step. The most important tool you'll need is a power screwdriver, which does most of the work for you. You are not building from scratch; you are simply putting the finished pieces together.
What is the single most important thing to get right for my chickens' health? If you focus on one thing, make it ventilation. Proper airflow is the key to preventing the buildup of moisture and ammonia, which can cause serious respiratory problems for your flock. A well-designed coop will have vents placed high above the roosting bars. This allows damp, warm air to escape without creating a cold draft on your sleeping chickens. It’s a feature that works year-round to keep the interior air fresh and healthy.
How much ground preparation is really necessary before the coop arrives? Taking the time to create a flat, level spot for your coop is critical. This isn't just about aesthetics; it's about the long-term structural integrity of the coop. If the base is uneven, it puts constant stress on the frame. Over time, this can cause the structure to warp, making doors and windows stick and creating gaps where predators or drafts could get in. Clearing the area and ensuring it's perfectly level is the best thing you can do to ensure a smooth assembly and a long-lasting home for your flock.
What if I run into a problem or have a question during the build? First, take a deep breath and step away for a minute. Often, a quick break is all you need to see the solution. Double-check the instruction manual to make sure you haven't accidentally swapped two similar-looking panels or missed a step. If a part seems to be missing or you're truly stuck, don't hesitate to contact the company you purchased from. A good coop company will have a support team ready to answer your questions and help you get back on track.